
When you think about the perfect workshop setup, most of us picture a massive pole barn or a dedicated garage with all the bells and whistles. But what happens when you’re working with limited space, a tight budget, and still need a functional workspace that can handle everything from welding to wrenching? That’s exactly the challenge that’s led more and more builders to get creative with shipping containers.

The beauty of a container conversion isn’t just about the novelty factor. These steel boxes offer something that traditional shop builds often can’t - complete modularity. You can set one up, use it for years, then pick it up with a flatbed and move it to your next property. For those of us who don’t own our land yet or are renting, that’s a game-changer.
The project starts with finding the right container. Single-trip containers are often worth the extra cash because they haven’t been beaten to death crossing oceans for decades. At around $4000-5000 delivered, it’s not pocket change, but when you break down the cost per square foot compared to traditional construction, the numbers start making sense. Plus, you’re getting walls, a roof, and a floor all in one shot.
Cutting it up isn’t your typical weekend warrior project - you’re essentially performing surgery on a huge steel box. The key here is understanding that shipping containers are engineered to be strong when they’re complete boxes. Start removing entire walls, and you need to think about structural integrity. Framing out openings you’ve cut with steel tubing is essential to prevent the whole thing from turning into a parallelogram.

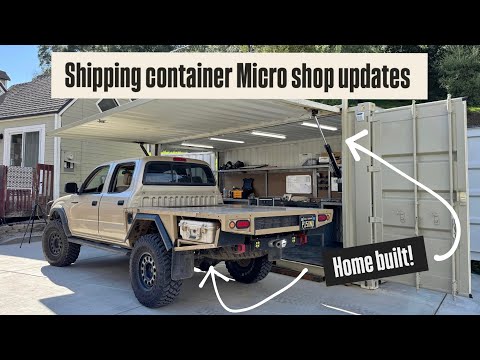
What makes these builds so satisfying is watching the transformation from a dark, cramped box into something that feels surprisingly spacious. The secret is in the doors. Instead of traditional hinged doors that eat up your workspace, hydraulic lifting systems or gas struts can turn entire walls into overhead canopies. Suddenly, your 160-square-foot container feels like it has double the usable space.
The hydraulic jack or gas strut setup might raise some eyebrows among the safety-conscious crowd - eight-ton Harbor Freight jacks holding up a 500 lb door over your heah wouldn’t be OSHA-approved!
But this is easy to fix: Once it’s deployed, pin or brace the canopy part in case the hydraulics fail. The examples here use a tube that drops over the jack and a sliding tube with a spring-loaded pin. Each drop into place to lock out the canopy overhead and prevent failures.
Tool storage is obviously important in these compact spaces. The trick is going vertical and making every inch count. Rolling toolboxes on the floor, pegboard on the walls, and overhead storage for the stuff you don’t need daily. Every wall has room for lots of tools and parts.
If you’re interested in a DIY plywood setup, check out the popular Ron Paulk setup for outfitting work trailers. Another modular option is the something like this Milwaukee Packout trailer build.
Your electrical setup doesn’t have to be complicated. A simple extension cord can handle basic lighting and power tools to start. As the build evolves, you can add an electrical panel, but the beauty of starting simple is that you can actually use the space while you’re still building it out.
Good flooring will pay off in comfort. Horse stall mats from the farm supply store are great for this application. They’re designed to handle hooves, manure, and weather, so they’ll laugh at whatever you throw at them in a workshop and weigh around 100 lbs for a 4x6 mat. Look to pay around $60 per mat. At 3/4" thick, they provide cushioning for your feet during long work sessions and protection for the container floor underneath.
The paint job isn’t just about looks - it’s about making the space feel intentional rather than industrial. A simple color match to your house or truck makes the container feel like it belongs rather than looking like temporary storage. The psychological impact of working in a space that feels finished and purposeful shouldn’t be underestimated.
Climate control becomes interesting in a steel box. Without proper ventilation, these things turn into ovens in summer and freezers in winter. The lifting door system actually helps with this - when that wall opens up, you get massive airflow that makes the space comfortable even on hot days. Add some strategic ventilation gaps, and you’ve got natural climate control that doesn’t require electricity.
What’s really compelling about container shops is how they change your relationship with your tools and projects. Everything becomes more organized by necessity. You can’t just pile stuff in corners like you might in a traditional garage (well, you can, but…). Every tool needs a home, every project needs a plan, and the result is often a more efficient workflow than you’d get in a larger, less organized space.
The security aspect is built-in. When you’re done for the day, you close up a steel box that’s essentially impenetrable without serious tools. No worrying about leaving expensive equipment out or dealing with weather exposure. Everything stays clean, dry, and secure.
For those considering this type of build, the key is realistic expectations. You’re not going to fit a full-size truck inside for engine swaps, but for fabrication work, small repairs, and general tinkering, these spaces punch way above their weight class. The constraint of the size actually forces better organization and workflow than many traditional shops achieve.
The investment makes sense when you consider the alternatives. A traditional shop build of similar functionality would cost significantly more and take much longer to complete. The container gives you a weatherproof workspace immediately, then you can focus on the interior buildout at your own pace.
Discover More
- How to Turn a Nearly-New $11,700 Wrecked Ranger Into a Sweet Budget Build
- This '03 Taco Looks Stock... Until You See It Skimming Whoops
- A Minimal, Removable, Stealth Camper in a Toyota Tundra Bed
- A Sleeper Taco on 35s/16" Travel/Supercharged That Does It All
- Budget Workshop Goals - Why Shipping Containers Are the New DIY Secret
- Build a 270 Degree Overland Awning for Under $150 - Here’s How
- From Salvage 4Runner to Race-Ready Beast - A DIY King of the Hammers Build
- From Stock to Savage: This Toy 4Runner Build Conquers Rocks, Desert...and Daily Life
- How a Stock Taco Became a 60 MPH Whoop-Slayer (Hint: Ls3)
- How a Wildland Firefighter Crafted the Ultimate Off-Grid Basecamp
- How Jack Turned a Daily Driver Taco Into a 37” Tire Beast - It Always Starts With Marketplace...
- Inside the Wild Build: Suzuki Samurai Goes Ultra4 Racing at KOH
- Is 7.5mpg Worth It to Run 37s on Your 4Runner and Become a Rockcrawling Beast?
- Notch a Tube in 2 Minutes, 38 Seconds - Without a Tube Notcher
- Supercharger, Long-Travel, 37s, and Overlanding - Is This the Tacoma You've Been Looking For?
- This Awesome DIY Taco Camper Build Proves You Don’t Need Big Bucks for Big Adventure
- This Clapped-Out Taco on 37s Is the Overland Rig You Wish You Had
- This Jeep Gladiator Packs a 426 Hemi for Real Off-Road Adventure in the Canadian Backcountry
- Unlock the Truth: Spring Over or Spring Under for Ultimate Off-Road Performance?
- What It’s Really Like to Race the Every Man Challenge at King of the Hammers See more